Master Verilog Write/Read File operations – Part 2
This practical tutorial covers Verilog write/read file operations and data transfer between testbench variables and Input / Output (IO) data files. Practice the Enhanced C-Style style Verilog file IO system tasks and functions: $fopen, $feof, $fgetc, $fgets, $fwrite, and more… Simple Verilog File I/O operations are described in this article.
Verilog-2001 brings an extra set of C-style file IO access methods for improved capabilities compared with simple write/read file access methods.
The initial Verilog-1995 capabilities allowed engineers to open a maximum of 31 files for I/O operations using a Multi-Channel Descriptor like $fopen(“data_in.txt”) (more here). Since this was limiting verification capabilities, the new version of file access methods offers the possibility to open up to 2**31 files in the same and read/write file access options. The new C-style Verilog file access methods are similar with C stdio routines (fopen, fgetc, fprintf, fscanf, etc…).
If you want to simply open a file, you can use the command file_handle = $fopen(“filename”, “w”); . This will give you access to a 32bit file handle that has bit 31 set, and is called a File Descriptor. Bit 31 is set to differentiate it from an MCD, and the values 0, 1, 2, are reserved by the system for stdin, stdout and stderr. File descriptors allow you to access 2**31 individual channels for read/write file operations.
Verilog Enhanced C-Style file IO access options
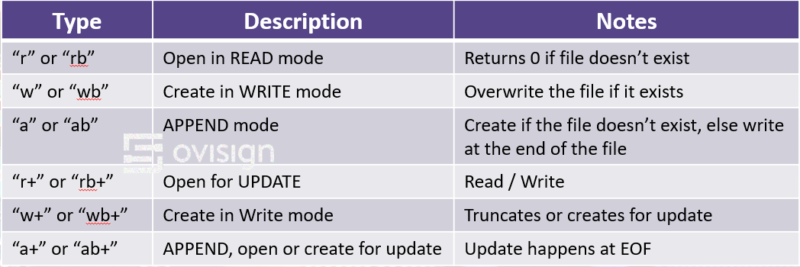
Verilog 2001 $fopen offers multiple file access options compared to the Verilog-1995 version, thus it allowing to set the read/write access mode for each file handled. Use “b” to distinguish between binary files and ASCII text files.
Exercise 1 – how to open and close files using Verilog File Descriptors
In this Verilog example, we can see how to declare three File Descriptors and open three files using them. We are going to test the Read, Write and Append access options.
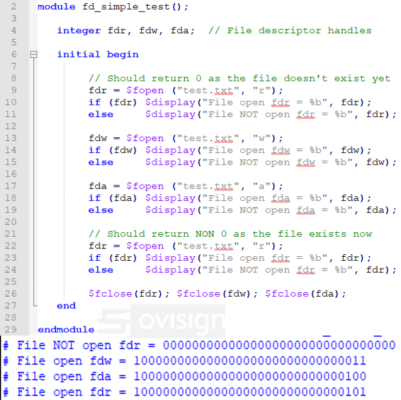
- First, declare three integer variables used as FDs (File Descriptors).
- Open test.txt in read mode. Because the test.txt file doesn’t exist, the operation should return an error, thus fdr = 0.
- Open test.txt in write mode. Since the file doesn’t exist, the simulator will create it in your simulator project folder (Modelsim for me) and assign an integer value to fdw.
- Next, open text.txt in append mode. The file exists from the previous operation, so the simulator will assign an integer to fda.
- Open test.txt in read mode again. Because the file was created in step 3, now the operation is successful and fdr is assigned an integer value.
- Use $fclose to release the file descriptors access to the file.
Note1: All File Descriptors are assigned an integer value with the MSB (most significant bit) set to 1. This is what differentiates them from Multi-Channel Descriptors.
Note 2: fdw[2:0] gets the value 3’b011 because the the values 3’b000, 3’b001 and 3’b010 are assigned to stderr, stdin and stdout. This is also confirmed by the value of fdr when we failed to open test.txt in read mode.
Note 3: While your simulator is open, you cannot delete test.txt from you file system.
Note 4: If you run the simulation again, fdr won’t be assigned to 0 on the first read-mode access because test.txt was already created by the last run of your simulation.
Verilog Enhanced C-Style file IO System Tasks/Functions
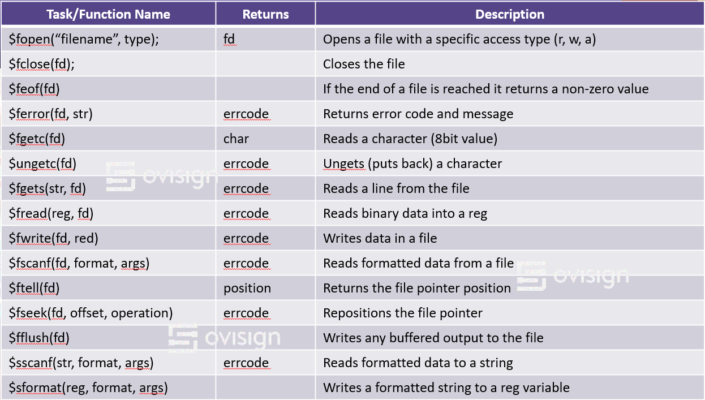
Here is a short list with some of the most popular Verilog C-style file IO access tasks and functions. If you want an extensive description of each system task/function, you can consult the IEEE Verilog 1364-2001 . Let’s master them by doing some practical examples!
Exercise 2 – Read all the characters from an input file ($fgetc), filter and write them in an output file ($fwrite)
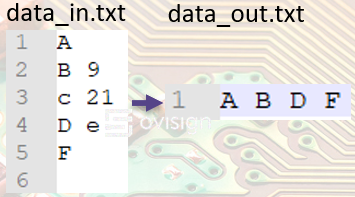 In this example we start from a file called data_in.txt which contains printable ASCII characters, and we want to filter only the capital letters and write them in data_out.txt. You can use the same file structure for data_in.txt, or create your own test vector. Note: data_in.txt needs to be created in the same folder you use for your simulator project (Modelsim in my case).
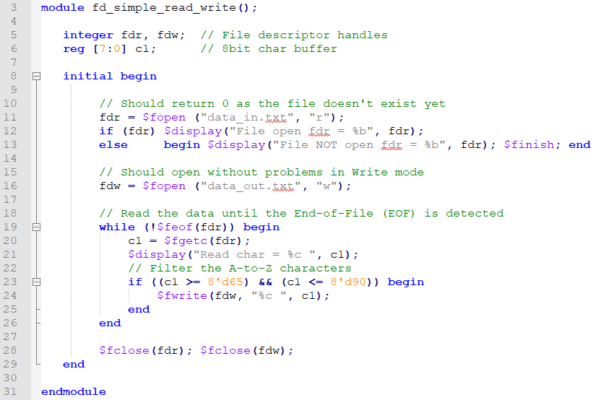
- First, declare two integer variables used as FDs (File Descriptors) and some buffers for data output.
- Next, open data_in.txt in read mode by using $fopen. If the file exists and is opened, we print the FD in the console, otherwise we stop the simulation. Note: If you don’t stop the simulation at this point with $finish, you can get undesired behavior from the simulator. fdw is used to open data_out.txt in write mode (this operation shouldn’t generate any error).
- Since we want to be able to read a file with any number of characters, we will read 1 character at a time (1byte) until we reach the end of the file (EOF). $feof(fdr) returns true when it reaches the end of the file, otherwise it returns the false value (or zero).
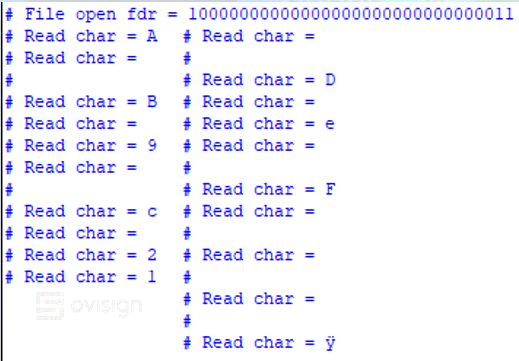
- $fgetc(fdr) will return 1 character (8bits) from data_in.txt. Next, we display the read character in the console. If you look at the console output, the space and newline (\n) characters are read from the input file and processed.
- $fwrite(fdw, “%c “, c1) is used to print the capital letters in character format in data_out.txt. If you don’t use the %c format specifier, $fwrite will print the decimal value of the read character, which is a number between 65 and 90.
- Finally, we use $fclose to release the read/write file access.
Exercise 3 – Read ASCII test vectors from an input file ($fgets) and write a processed string in an output file ($fwrite)

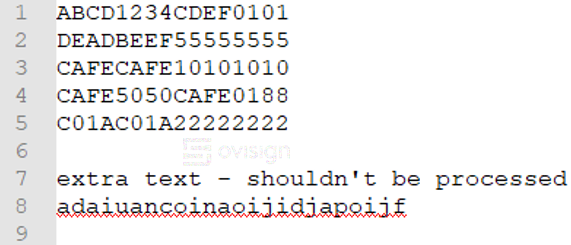
Another widely used scenario is reading test vectors from a file, apply them to a Design Under Test (DUT) and write the results in another file. In this exercise, we will read the first five 16 characters patterns from test_vect.in, increment each character with 1 (emulate a simple DUT), and write the result in results.out. All characters after the first 5 lines should be ignored.
Note: we are processing the values from test_vect.in as 8bit ASCII values so A has the decimal value 65 and A+1 = B which is decimal 66. Please don’t confuse this with the 0xA 4bit hexadecimal value which has a decimal value of 10.
 Please create a new file called test_vect.in in the same folder you simulate your project.
test_vect.in contains 5x 16bytes ASCII patterns. There is some extra text after line 5 but we don’t care about it.
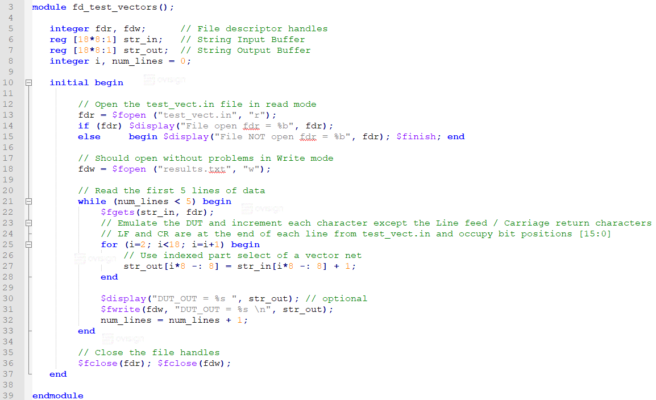
- We first declare the file descriptor handles, two 18x8bit character for the IO strings, and two variables used in some loops.
- Open the write/read files using Verilog file descriptors (identical to Exercise 2).
- At line 21, we have a while loop used to read the 5 lines of ASCII text. This will ignore all the other lines starting from line 6 to the EOF.
- $fgets(str_in, fdr) will read characters from the file specified by fdr in the reg str until either str is filled, or the newline / end-of-file condition occurs. Note the newline and carriage return characters are also transferred to str.
- Line 25 emulates the behavior of a Verilog module that increments with 1 an 8bit input ASCII code (I used this for the sake of simplicity). Our string has 18 characters from which the last two are line feed and carriage return. We ignore these two characters and increment the ASCII value of the characters [18:2]. You process all the characters using a for loop and an indexed part select of a vector net 😎.
- At line 30, print the output string str_out in the console.
- $fwrite(fdw, “DUT_OUT = %s \n”, str_out) will write in fdw a formatted message containing our output string. The %s format descriptor is used to print the value of str_out in the string format.
- At line 36, release the file descriptors IO access from the files test_vec.in and results.txt.
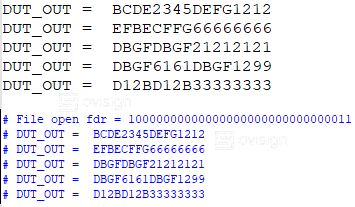 After you simulate the Verilog file fd_test_vectors.v, you should get these results:
Congratulations for finishing all the exercises! You now can use Verilog C-style system tasks and functions for file IO operations!
I hope you enjoyed this practical Verilog tutorial. If you’d like to receive more articles like this, please join Ovisign’s newsletter or enter our Facebook community!
Want to easily master the basics of Verilog through practical examples?
Back in the day when I first started working with Hardware Description languages (Verilog and VHDL), I had tons of problems at every corner. The simulator wasn’t working, I didn’t know how to debug, I found it hard to understand how to translate from a digital circuit schematic to a Verilog code, and it was very hard to even write proper testbenches 😭😔… No wonder less than 2% of all engineers work in the Digital Semiconductors industry.
Luckily I didn’t quit, and after 20000h in Verilog/SystemVerilog for design and verification and a PhD in Electronics, I put together all the pieces of the puzzle I worked so hard to solve back in the days 😊. I created a 5h hands-on Verilog course that will save you hundreds of hours of trial-and-error and frustration so you can easily master Verilog HDL Fundamental for Digital Design and Functional Verification! 😎 Let’s go together in this adventure in the world of Digital Semiconductors and Verilog 🚀🚀🚀!